Utility applications perform simple tasks: they have a one-page
main view and another window that is brought into view with a
flip animation. The Stocks and Weather applications that ship with the
iPhone and iPod touch are examples of applications that use this pattern.
Both are optimized for simple tasks that require the absolute minimum of
user interaction. Such applications are usually designed to display a
simple list in the main view, with preferences and option settings on the
flip view. You access the flip view by clicking a small
i icon from the main view.The Xcode Utility Application template implements the main view and gives the user access to a
flipside view. It is one of the most extensive templates in Xcode and it
implements a fully working utility application, which is fortunate as the
documentation Apple provides regarding this type of application is
otherwise somewhat lacking in details.
Open Xcode and start a new project. Click Application under the
iPhone OS group, and then select Utility Application from the New Project
window as the template (see Figure 1). Click Choose, and
name the project “BatteryMonitor” when requested.
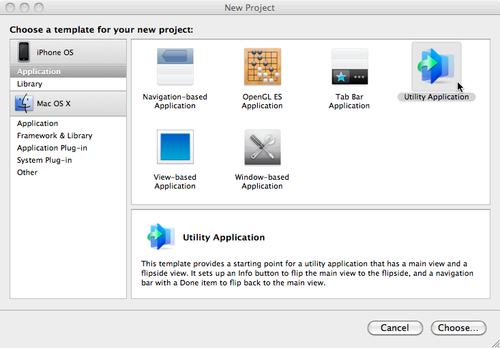
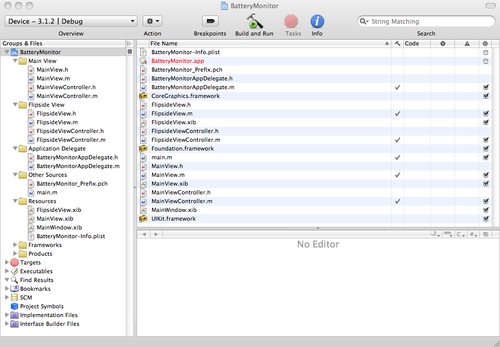
Figure 2 shows the
Project window in Xcode and lists the files the template generates. The
names of the classes the template generates are meant to hint strongly at
what each of them does, but if not, Xcode has conveniently put the
relevant classes into groups. Since the template implements all the logic
necessary to control the application’s interface, we only need to
implement our own UI and some basic logic to control it.
Click Build and Run to compile and run the application. You’ll find
that it’s a fully working utility application, although with blank main
and flipside views.
1. Making the Battery Monitoring Application
The somewhat descriptive name of the application has
probably revealed its purpose already. We’re going to implement a
simple battery monitoring application, and to do so I’m going to
introduce you to the UIDevice class.
This is a singleton class that provides
information relating to your hardware device. From it you can obtain
information about your device such as its unique ID, assigned name,
device model, and operating system name and version. More importantly,
you can also use the class to detect changes in the device’s
characteristics such as physical orientation, and register for
notifications about when these characteristics change.
Note:
A singleton class is restricted in some
manner such that only one instance of the class can be created.
This design pattern can be used to coordinate actions or
information across your application. Although some argue that because
use of singleton classes introduces global state into your
application, and is therefore almost by definition a bad thing, I
think that when it is used correctly the pattern can simplify your
architecture
considerably.
Information—and notifications—about the device battery state
weren’t introduced until the 3.0 update of the SDK. Even now the
implementation is somewhat coarse-grained (notifications regarding
charge level changes occur in only 5% increments).
Warning:
The UIDevice class has several limitations, and some developers have
resorted to the underlying IOKit framework to obtain more information
about the device (e.g., better precision to your battery
measurements). However, while Apple marked the IOKit as a public
framework, no documentation or header files are associated with
it.
If you use this framework and try to publish your application on
the App Store, it is possible that Apple will reject it for using a
private framework despite its apparent public status. In the official
documentation, IOKit is described as “Contain[ing] interfaces used by
the device. Do not include this framework directly.”
1.1. Building our interface
First we’re going to build our interface. Double-click on the
MainView.xib file (located in the
Resources group in the Groups & Files pane) to open it in
Interface Builder. You’ll see that the default view that Xcode
generated already has the Info button to switch between the main and flipside views. Not only is
it there, but it’s connected to the template code, so it’s already
working.
The UI will consist of just three UILabel elements, so drag and drop three
labels from the Library (⌘-Shift-L, then choose Cocoa Touch→Inputs & Values) onto the Main View
window, and position them roughly as shown in Figure 3.
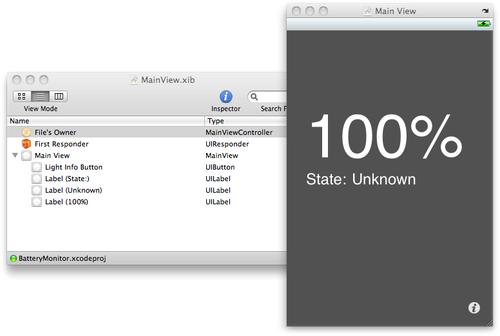
You can use the Attributes Inspector (⌘-1) to change the font
size and color as I have done with my view. We’ll be setting the text
of the labels from inside our code, but for now I’ve added placeholder
text (“100%”, “State:”, and “Unknown”) using the Attributes tab so
that I can position the labels more neatly and get a better idea of
how my UI will look.
That’s all we’re going to do to the main view. Save the file and
return to Xcode. Open the FlipsideView.xib file. You’ll see
that this time the default view that Xcode generates already has a
navigation bar and a Done button present and connected to the template
code. You need to add a label (UILabel) and switch (UISwitch) to this interface, as shown in
Figure 4.
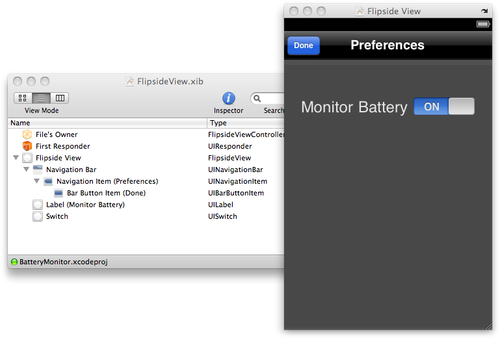
Drag and drop the two elements from the Library window
(⌘-Shift-L, then choose Cocoa Touch→Inputs & Values) into the Flipside View
window and position them as shown in Figure 6-4. Set the text of
the label to “Monitor Battery”, and using the Attributes pane of the
Inspector window set the label text color to white. The default black
text won’t show up well against the dark gray background of the view.
That’s all that’s needed. Save the file in Interface Builder, and open
the BatteryMonitorAppDelegate.h file in Xcode
(it’s in the Application Delegate folder in the Groups & Files
pane).
1.2. Writing the code
In the interface, we need to add a Boolean variable that stores the flag that indicates
whether the app is currently monitoring the battery state. Add the
following inside the @interface
declaration:
BOOL monitorBattery;
We also need to make this a property. Add the following next to the existing @property declarations (but before the
@end):
@property (nonatomic) BOOL monitorBattery;
This means that in the
BatteryMonitorAppDelegate.m implementation file,
we also need to synthesize the property to create the accessor
methods. Open that file and add the following next to the existing
@synthesize statements:
@synthesize monitorBattery;
By default, we’re going to make it so that the application
starts with battery monitoring turned off, so in the applicationDidFinishLaunching: method we
must set the flag to NO. Add the
following to the top of the method:
self.monitorBattery = NO;
Next, open the FlipSideViewController.h
interface file (you can find it in the Flipside View folder in the
Groups & Files pane) and add the lines shown in bold:
@class BatteryMonitorAppDelegate;

@interface FlipsideViewController : UIViewController {
    id <FlipsideViewControllerDelegate> delegate;
    BatteryMonitorAppDelegate *appDelegate;
						    IBOutlet UISwitch *toggleSwitch;
}
In the FlipSideViewController.m
implementation file, you first need to import the application delegate
header file (using the @class
forward declaration in the interface file does not remove the need to
#import this header file). Add the following line to
the top of FlipSideViewController.m:
#import "BatteryMonitorAppDelegate.h"
Next, make the changes shown in bold to the viewDidLoad: method:
- (void)viewDidLoad {
    [super viewDidLoad];
    self.view.backgroundColor = [UIColor viewFlipsideBackgroundColor];
    self.title = @"Preferences";
						    appDelegate = (BatteryMonitorAppDelegate *)
						      [[UIApplication sharedApplication] delegate];

						    toggleSwitch.on = appDelegate.monitorBattery;

}
Now modify the done: method to save
the status of the toggle switch back to the application delegate when you close the
flipside view:
- (IBAction)done {
    appDelegate.monitorBattery = toggleSwitch.on;
    [self.delegate flipsideViewControllerDidFinish:self];
}
Finally, add the following code to the dealloc: method (this releases the toggleSwitch variable):
- (void)dealloc {
    [toggleSwitch release];
    [super dealloc];
}
The modifications we need to make to the main view controller
are a bit more extensive than those we’ve made thus far. Open the
MainViewController.h interface file in Xcode and
make the changes shown in bold. You can find this file in the Main
View folder of the Groups & Files pane.
#import "FlipsideViewController.h"

@class BatteryMonitorAppDelegate;


@interface MainViewController : UIViewController
  <FlipsideViewControllerDelegate>
{
    BatteryMonitorAppDelegate *appDelegate;
						    IBOutlet UILabel *levelLabel;

						    IBOutlet UILabel *stateLabel;
}

- (IBAction)showInfo;

- (void)batteryChanged:(NSNotification *)note;
						- (NSString *)batteryLevel;
						- (NSString *)batteryState:(UIDeviceBatteryState )batteryState;

@end
Save the interface file, and then open the
MainViewController.m implementation file in
Xcode. We declared a reference to the application delegate in the
interface file, so now we need to import the relevant header file. Add
this line at the top:
#import "BatteryMonitorAppDelegate.h"
We also need to grab a reference to the application delegate in
the viewDidLoad: method.
Uncomment the method (remove the lines that consist solely of /* and */
immediately before and after the method) and add the lines shown in
bold:
- (void)viewDidLoad {
    [super viewDidLoad];
    appDelegate = (BatteryMonitorAppDelegate *)
						      [[UIApplication sharedApplication] delegate];

}
Next, we need to implement the viewWillAppear:
method. At this point, you may be wondering what the difference is
between this method and the previous viewDidLoad: method. The answer is that
they’re called at different times: viewWillAppear: will be called each time the
view becomes visible, while viewDidLoad: is called only when the view is
first loaded. Because the changes we make to the preferences (on the
flip side) affect the main view, we need to use viewWillAppear:, which is triggered each
time we flip back from the preferences view to the main view. Add the
following to MainViewController.m:
- (void)viewWillAppear:(BOOL)animated {
    UIDevice *device = [UIDevice currentDevice];
    device.batteryMonitoringEnabled = appDelegate.monitorBattery;

    if (device.batteryMonitoringEnabled) {
        [[NSNotificationCenter defaultCenter] addObserver:self
           selector:@selector(batteryChanged:)
           name:@"UIDeviceBatteryLevelDidChangeNotification" object:nil];

        [[NSNotificationCenter defaultCenter] addObserver:self
           selector:@selector(batteryChanged:)
           name:@"UIDeviceBatteryStateDidChangeNotification" object:nil];
    } else {

        [[NSNotificationCenter defaultCenter] removeObserver:self
          name:@"UIDeviceBatteryLevelDidChangeNotification" object:nil];
        [[NSNotificationCenter defaultCenter] removeObserver:self
          name:@"UIDeviceBatteryStateDidChangeNotification" object:nil];
    }
    levelLabel.text = [self batteryLevel];
    stateLabel.text = [self batteryState:device.batteryState];

    [super viewWillAppear:animated];

}
Since the object may be registered as an observer when we
deallocate this view, we also need to make sure we remove ourselves as
an observer of any notifications in the dealloc: method. Add the lines shown in bold
to the dealloc: method:
- (void)dealloc {
    [[NSNotificationCenter defaultCenter] removeObserver:self];
						    [levelLabel release];
						    [stateLabel release];
    [super dealloc];
}
We also need to implement the batteryChanged: method; this method is
called when our application is notified of a change in battery state.
Here, all we’re doing is updating the text of our two labels when we
receive a notification of a change. Add the following to
MainViewController.m:
- (void)batteryChanged:(NSNotification *)note {
    UIDevice *device = [UIDevice currentDevice];
    levelLabel.text = [self batteryLevel];
    stateLabel.text = [self batteryState:device.batteryState];
}
Finally, we need to implement those convenience methods. Add the
following to MainViewController.m:
- (NSString *)batteryLevel {
    UIDevice *device = [UIDevice currentDevice];

    NSString *levelString = nil;
    float level = device.batteryLevel;
    if ( level == -1 ) {
        levelString = @"---%";
    } else {
        int percent = (int) (level * 100);
        levelString = [NSString stringWithFormat:@"%i%%", percent];
    }
    return levelString;
}

- (NSString *)batteryState:(UIDeviceBatteryState )batteryState {

    NSString *state = nil;
    switch (batteryState) {
        case UIDeviceBatteryStateUnknown:
            state = @"Unknown";
            break;
        case UIDeviceBatteryStateUnplugged:
            state = @"Unplugged";
            break;
        case UIDeviceBatteryStateCharging:
            state = @"Charging";
            break;
        case UIDeviceBatteryStateFull:
            state = @"Full";
            break;
        default:
            state = @"Undefined";
            break;
    }
    return state;
}
We’re done in Xcode; let’s go back into Interface Builder to
make all the necessary connections. Locate
FlipsideView.xib under Resources in the Groups
& Files pane and double-click it to open it in Xcode.
1.3. Wiring the application in Interface Builder
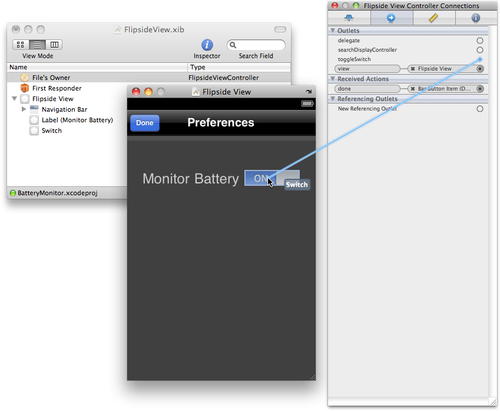
In the FlipsideView.xib file we need to
make only one connection: between the toggleSwitch outlet and the UISwitch. To make the connection, click File’s Owner in the
FlipsideView.xib window, and then drag the
toggleSwitch outlet from the
Connections Inspector (⌘-2) to the switch, as shown in Figure 5.
Save the FlipsideView.xib file and open the
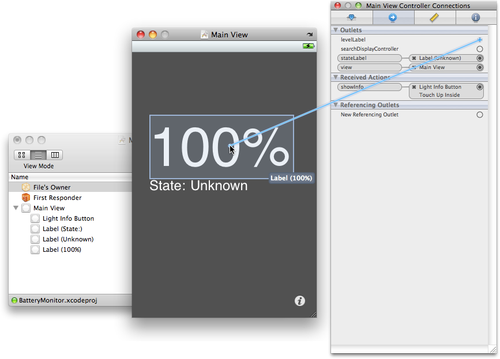
MainView.xib file. This time we need to make two
connections. Just as you did in FlipsideView.xib,
select File’s Owner and use the Connections Inspector to make
connections between the levelLabel
and stateLabel outlets and their
corresponding UILabel in the main
view, as shown in Figure 6.
At this point, we’re done. We’ve implemented everything we need
to in code, and we’ve linked all of our outlets to our interface.
Unfortunately, since this application makes use of the UIDevice battery monitoring API, and iPhone
Simulator doesn’t have a battery, we’re going to have to test it
directly on the device.
To deploy the application onto your device, you need to edit the
Bundle Identifier inside the
BatteryMonitor-Info.plist file to something
appropriate, and you need to set the Code Signing Identity associated
with the project in the Project Info window (although in most cases
Xcode will select an appropriate signing identity automatically, if
you have more than one developer profile installed this isn’t
guaranteed). Once this is done, change the
Active SDK in the overview window to “iPhone Device” and click Build
and Run. Xcode should compile and deploy the application onto your
iPhone.
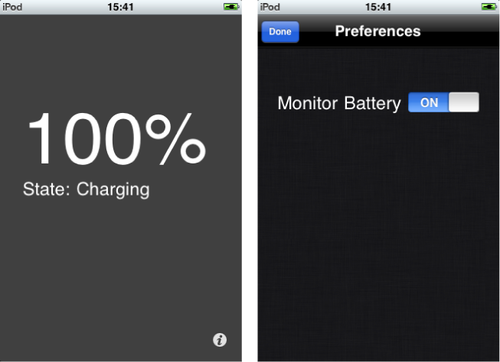
Click the Info button in the bottom-lefthand corner to switch to
the flip side and enable battery monitoring in the preferences pane.
Click the Done button and return to the main view. Both the battery
level and the state should have changed. While the battery level only
changes every 5%, you can get some immediate feedback by plugging and
unplugging your device from your Mac. The state should change from
“Full” or “Charging” (see Figure 7) to
“Unplugged”.